


Your low speed handpiece feels sluggish, or it’s making a weird grinding noise, and nothing obvious looks broken. In a lot of cases, the cause isn’t a worn part at all. It’s dental handpiece maintenance that got skipped or performed improperly.
This guide walks through cleaning and lubricating a low speed dental handpiece the right way, step by step, so you can catch the problem before it turns into a repair.
Key Takeaways
- Premature low speed handpiece failures can trace back to missed or improper lubrication.
- Oil goes into the drive air port, never the exhaust port, or it gets blown right back out.
- Low speed components need less oil than high speed handpieces. A dropper, not an aerosol spray, is usually the right tool.
- Always use an approved handpiece lubricant. The wrong product can damage internal components or may not be FDA cleared for human use.
- Lubrication intervals vary by model, so check your manufacturer’s instructions.
Before You Start
Cleaning and lubricating a low speed handpiece takes a few minutes per unit, and it’s one of the few maintenance tasks that directly extends the life of the equipment. Skipping it, even occasionally, adds up faster than you might expect.
Here’s what you’ll need on hand:
- Handpiece approved lubricant, a thicker liquid oil in a dropper depending on your handpiece
- A soft brush or gauze for external cleaning
- A sterilization pouch for the finished handpiece
- Your handpiece’s care instructions, since exact intervals and lubricant types differ by model and brand
A low speed system typically breaks down into three parts: the motor, the contra sheath or nose cone, and the latch head or angle. Each piece gets cleaned and lubricated separately before the whole thing goes back together.
Step 1: Clean the Exterior First
Before any lubricant goes in, clean off any bioburden from the outside of the handpiece.
- Wipe down the motor, contra angle, and prophy angle with a brush or gauze.
- Use only running water to clean the exterior surfaces
- Check the threads at the back of the motor and the connecting tubing, since debris tends to collect there.
Step 2: Disassemble the Components
Separate the motor from the contra angle or nose cone.
Lubricating each part on its own, rather than trying to oil the whole assembled unit at once, is what gets the lubricant where it actually needs to go.
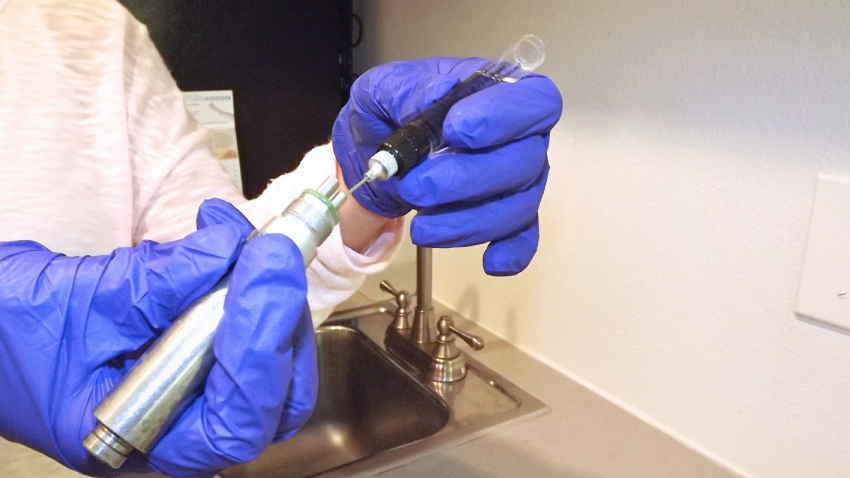
Step 3: Lubricate the Motor
Locate the drive air port on the motor. It is the smaller of the two tubes, and it’s the same port on every handpiece.
- Apply two or three drops of lubricant as your instructions indicate into the drive air port.
- Do not use too much oil. Over oiling a motor can cause the excess to gum up the delicate vanes inside the motor, resulting in sluggish operation
- Never lubricate through the exhaust port. Lubricant added there gets expelled before it reaches the internal components.
- Note: Some motors are lube free and do not require this step
Pro Tip: If you’re not sure which port is which, your handpiece’s manufacturer manual will show a diagram.
Step 4: Lubricate the Attachments
- Use handpiece oil in a dropper. Too much lubricant can make the attachment run sluggish rather than smooth.
- Low speed attachments generally need less oil than high speed handpieces.
- Nosecones typically do not require lubrication per the manufacturers. However we recommend using your high speed spray and a lube tip to spray a little oil down into the chuck. This will provide lubrication to the bearings, and reduce oxidation that occurs during autoclaving
- Older sheaths or angle adaptors can use a little oil at each end, newer modes are lube free
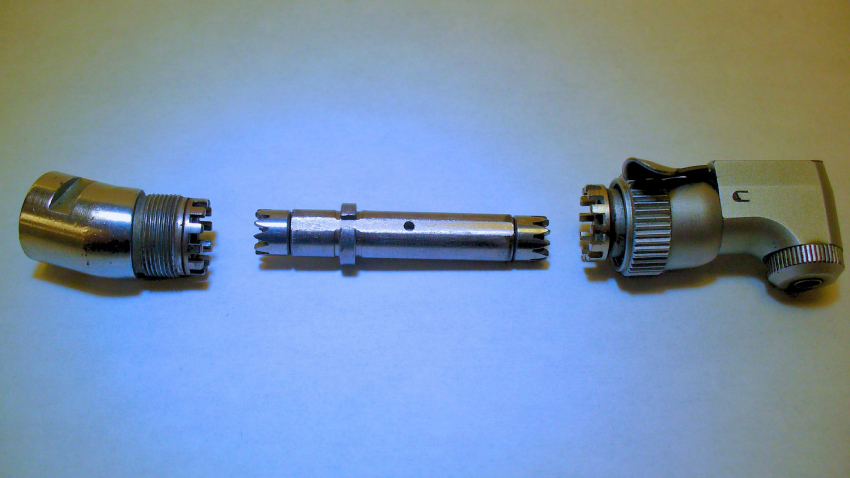
- Latch angles should be completely taken apart
- Unscrew the nut in the middle of the angle
- Remove the transmission gear from the head
- Drop oil down into the head to lubricate the bearings
- Place a drop of oil under each gear on the transmission shaft
Step 5: Reassemble and Purge Excess Lubricant
Put the handpiece back together and run it for about 10 to 20 seconds to distribute the lubricant and push out anything excess.
- Run the handpiece over a paper towel or gauze so you can see what’s being expelled.
- If the expelled lubricant looks discolored, repeat the process until it runs clear.
Step 6: Wipe Down and Sterilize
Remove any bur or attachment not meant to be sterilized in place, wipe off any remaining exterior lubricant, and sterilize according to your manufacturer’s instructions.
Common Mistakes to Avoid
- Lubricating through the wrong port. Oil in the exhaust or water port never reaches the parts that need it.
- Using a lubricant not approved by the manufacturer. Non-approved products can damage seals and gears, and they can void your warranty.
- Over-oiling low speed attachments. More lubricant isn’t better here. Excess oil left inside makes the handpiece sluggish.
- Skipping cleaning before lubricating. Oiling over debris just traps contamination inside.
- Guessing at the schedule. Some practices lubricate after every use, others follow a different interval for low speed components. Your manufacturer’s instructions are the source of information.
Pro Tips from the Bench
- Match lubricant to model, not habit. What works for one brand’s motor isn’t automatically right for another. Check the label before assuming.
- Watch the color test. Clear lubricant on purge means you’re done. Discolored lubricant means keep running it until it clears.
- Keep a simple log if more than one staff member handles sterilization, so lubrication doesn’t get missed or duplicated.
- Don’t wait for a symptom to start caring for the attachments, too. The nose cones and latch angles wear just as much as the motor does.
When Cleaning and Lubrication Aren’t Enough
Proper cleaning and lubrication solve a lot of performance issues on their own. But if you’ve been consistent with both and the handpiece still runs weak, loud, or hot, the issue is likely mechanical rather than maintenance-related.
We’re Here When You’re Ready
Handpiece Express has repaired low speed motors, contra angles, nose cones, and prophy angles since 1994, and most repairs are completed the same day your handpiece arrives. If proper lubrication hasn’t solved the problem, a free estimate will tell you exactly what’s going on before you commit to anything.
Send in Your Low Speed Handpiece to Handpiece Express for a Free Evaluation.
📞 Call: (800) 895-7111
Frequently Asked Questions
It depends on the model. Some manufacturers recommend lubrication after every use, while others allow for a longer interval on low speed attachments. Check your specific manufacturer’s instructions rather than following a generic schedule.
Use only manufacturer-approved lubricant for your specific handpiece. Using an unapproved product can damage internal seals and gears, and it may void your warranty.
Friction builds up faster than most people expect, which shows up as reduced power, unusual noise, or overheating. Skipping lubrication regularly is one of the most common reasons low speed handpieces need repair earlier than they should.
Yes. Low speed components generally need less lubricant than high speed handpieces, and a dropper is used for the thicker low speed oil.
Yes. Excess lubricant left inside a low speed attachment can make it run sluggish. Purging the handpiece for 10 to 20 seconds after lubricating helps clear out anything extra.
That usually points to a mechanical issue rather than a maintenance one. Send your handpiece to Handpiece Express using our free mailer kit to get it back in working order.